Dr. Prabhuraj Parasuraman,
Department of Mechanical Engineering,
Methodist College of Engineering and Technology.
Hyderabad, Telangana

Dr. S. RAJAKUMAR,
Associate Professor,
Department of Manufacturing Engineering,
Annamalai University, Annamalai Nagar-
608002, Tamilnadu.
Abstract
High strength heat treatable aluminium alloy AA7075T-651 is widely used in aircraft, defence and automobile industries. Use of these alloys in all industries sectors for their excellent strength weight ratio and good corrosion resistance. However, the application of aluminium alloy in the marine environment exhibits poor corrosion performance. High strength alloys are also tough to join by fusion technique due to poor solidification and microstructure in the nugget zone. Friction Stir Welding is a reliable technique for joining aluminium alloys in solid-state conditions with good weldability. In this work, rolled aluminium plates with a thickness of 10mm were square butt welded by Friction Stir Welding (FSW) process. The mechanical properties and metallurgical features of FSW joints are compared in detail. The microstructure changes of substrate metal and weld nugget zone of FSW was studied using an optical microscope. The mechanical behaviours such as fracture toughness, tensile strength and hardness test have been carried out in substrate and weld metal. It was observed that the mechanical properties of the weld joint are lower than the base metal.
Keywords: AA7075T-65; FSW; Fracture toughness; microstructure.
| 1.0 INTRODUCTION |
Heat treatable aluminium with high strength is used in aerospace components, missile parts, all-terrain vehicle sprockets (ATV) and defence applications. The alloys’ strength-to-weight ratio and excellent formability are general factors for consideration in the sectors mentioned above.
AA7075-T651 high strength aluminium alloy (Al-Zn-Cu-Mg) has good resistance to general corrosion due to the formation of adherent oxide film[1]. Friction stir welding (FSW) has been an ideal process for joining heat–treatable aluminium alloy since 1991[1,2]. The solid-state method finds significant application in engineering sectors[3]. Defence vehicles prioritize the integrity of structures in defence sectors[4]. The FSW process overcomes the issue of porosity, hot cracking and distortion in the weldments, which are often associated with conventional welding processes [5]. The simultaneous rotation and translation are characteristic asymmetry between the adjoining sides. The advancing side is the side where the tool rotation is within the direction of the translation of the welding tool.
In contrast, the other side, where the two motions, rotation and translation counteract, is termed the retreating side. FSW joints usually consist of four different regions: unaffected base metal, heat affected zone (HAZ), thermo- mechanically affected zone (TMAZ) and friction stir processed (FSP) zone. The formation of the above regions is affected by the material flow behaviour under rotating non-consumable tool. But the material flow behaviour is primarily influenced by the FSW tool profiles, the FSW tool dimensions and the FSW process parameters [6-7]. The structure in the nugget region is fine and equiaxed with grain sizes significantly smaller than the parent material grain, which is due to the higher temperature and extensive plastic deformation [8]. There have been a lot of efforts to understand the Effect of process parameters on the corrosion behaviour, microstructure configuration and mechanical properties of FSW joints [9]. Among these works, only a few authors exhibited a variation of fracture toughness study in various zones of an FSW weld. The present investigation determines the fracture toughness correlated with tensile strength and microhardness behaviour of friction stir welded AA7075T-651 aluminium alloy joint.
2.0 MATERIAL AND METHODS
A 10mm thick rolled AA7075 alloy plate with the nominal chemical composition of (wt%), Zn 5.21%, Mg 2.10%, Cu 1.21%, Si 0.58%, Fe 0.35%, Mn 0.12%, and balance of Al was used in this investigation, the alloy was in T651 condition, after having been subjected to heat-treatment process. Friction stir welding (FSW) was carried out Centre for Material joining and research (CEMAJOR) at Annamalai University, Tamilnadu.
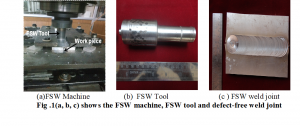
The plates were extracted and joined to the dimension of 10×50×150 mm to make a butt-welded joint. The welding was perpendicular to the rolling direction of the specimens. Fig .1(a, b, c) shows the FSW machine with the tool and defect-free weld joint. The friction stir welded tool was an H13steel with a taper threaded pin end. It was quenched and tempered to a hardness of 47HRc. The tool shoulder was 30 mm, the pin diameter 10 mm, and the pin length was 9 mm. Table 1 shows the optimized welding parameter to produce a defect-free joint.
| Table.1 FSW process parameters | |||
| Process parameters | Tool rotational speed in rpm | Axial load in kN | Welding Speed in mm/min |
| Values | 750 | 12 | 30 |
The mechanical properties like ultimate strength yield strength of AA 7075 joint were obtained from ASTM E8 standard. Table 2 shows the mechanical properties of the friction stir welded AA7075 joint.
| Table.2 Mechanical properties of parent metal and weld joint | ||||
| Material | Yield strength (MPa) | Tensile strength (MPa) | Elongation in % | Notch Tensile Strength (MPa) |
| Base Metal | 485 | 589 | 11 | 600 |
| FSW | 350 | 412 | 9 | 429 |
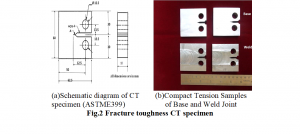
The fracture toughness tests were conducted per the ASTM E399 guideline for the parent metal and FSW joints. The fatigue pre cracking of (CT) test specimen was carried out at the laboratory temperature with 6Hz frequency. The load ratio(R) is 0.1, using load control sine were on a servo-hydraulic controlled dynamic testing machine. Fig.2 shows the fracture toughness test specimen of base metal and weld joint. The microhardness measurement was investigated across the weld joint as traverse direction from weld centre with 0.5kg load and a dwell time of 15 seconds.
The fractured surface of the specimen is cleaned with orthophosphoric acid and analyzed using scanning electron microscopy (SEM). Keller’s reagent revealed the microstructure. The fracture surface, the specimen is exposed to 2% weight of oxalic acid and examined with the help of a Scanning Electron Microscope (SEM) for fractography analysis.
3.0 RESULT AND DISCUSSIONS
3.1 Microstructure Analysis
Fig.3 shows the optical micrographs of the Friction Stir weldment. It revealed the various region of the cross-section of weldments, such as Base Metal(BM), Weld Nugget Zone(WNZ), Thermo Mechanical Affected Zone in Advancing Side(TMAZ-AS), Thermo Mechanical Affected Zone in Retreating Side( TMAZ-RS) and Heat Affected Zone (HAZ).
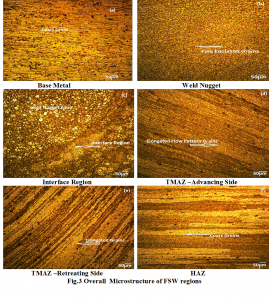
Figure 3 shows the optical microstructure of Friction Stir Weldment. The microstructure of base metal (AA7075T-651 aluminium alloy), as shown in Fig.3 (a), reveals the elongated grains along the rolling direction. Due to dynamic recrystallization, the weld nugget (Fig.3 (b)) consists of refined equiaxed grains. The weld nugget was developed by stirring the tool action and forging pressure. As a result, the weld nugget zone shows more refined grains than the base metal grain structure [10]. Fig.3(c) shows the interface region between the weld nugget and the thermomechanical affected zone. Coarser grains were present in TMAZ due to the influence of temperature.
3.2 Hardness measurement
Table 3 shows the hardness of various regions of friction stir welded AA 7075. Figure 3 shows the graphical representation of the hardness profiles of the FSW regions. The average value of substrate metal hardness is 172Hv. The average value of the weld nugget (WN) zone and the heat-affected zone (HAZ) are 142Hv and 157 Hv, respectively.
Table; 3 Hardness values in various regions of FSW joints.
| FSW regions | Base Metal | HAZ | TMAZ(RS) | Nugget Zone | TMAZ(AS) | HAZ | Base Metal | ||
| Distance from the weld centre (mm) | -15 | -12.5 | -10 | -5 | 0 | 5 | 10 | 12.5 | 15 |
| FSWAA7075
T-651 alloy |
172 | 163 | 127 | 14 | 145 | 147 | 125 | 155 | 179 |
The influence of friction heat dissolved the metastable precipitates in the nugget zone, resulting in reduced hardness. The hardness of the TMAZ zone is lower than the weld nugget region as the coarsening grain structure and dissolved MgZn2 residues. These factors predominantly reduce the hardness in the TMAZ region.
3.3 Tensile and Fracture toughness behaviour.
The transverse tensile properties such as yield strength, tensile strength, notch tensile strength of friction stir welded AA7075 aluminium alloy joints are presented in Table 4. In each condition, three specimens were tested, and the averages of three tensile tests were recorded. The mechanical properties of FSW joints depend on grain structure, which depends on the welding parameter such as tool rotation speed, weld ding speed, and axial load.
| Table4: Mechanical properties of Parent and FSW joints | |||||
| Material | Yield strength (MPa) | Tensile strength (MPa) | Elongation in % | Notch Tensile Strength (MPa) | Fracture Toughness
MPa
|
| AA7075 T651 | 485 | 589 | 11 | 600 | 30 |
| FSW | 330 | 389 | 9 | 410 | 23 |
The weld joint strength is lower than the base material tensile strength. The ultimate tensile strength of the material is based on tensile properties. From the result, the notch tensile property is superior to the smooth tensile specimen. The fracture test was carried out in the Instron fatigue machine. The CT specimen was prepared as per ASTM E399 standard. The fracture toughness of parent and weld metal are prescribed in table4. The FSW joint fracture toughness is increased compared to other conventional welding processes. Figure 4 shows the relationship between crack opening displacement and parent metal FSW applied load.
3.4 Fractogrphy analysis
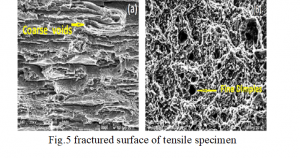
The fractured tensile samples are shown in Figure5. The Scanning Electron Microscope analysis was performed on the smooth tensile specimen of the parent metal and FSW AA7075T-651 aluminium alloy joints. The SEM fractured micrograph shows elongated and beach mark grain structures were observed.

In the FSW joint appeared more dimple type fracture is confirmed. It reveals the friction stir welding process reducing the elongation compared with the parent metal. In both conditions, the ductile mode fracture appeared. It was also confirmed that intergranular and transgranular mode has appeared on parent metal and weld samples. MgZn2 and Al2Cu in the matrix led to the intergranular fracture.
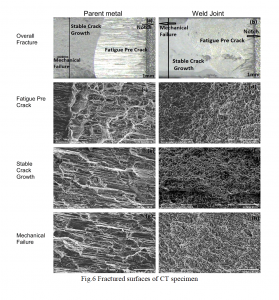
Fig. 6 shows fracture surface morphology of parent metal and stir zone of AA7075-T651 aluminium alloy. The samples were drained and examined by Scanning Electron Microscope (SEM). Figures 6 (a and b) reveal the parent metal’s overall macro-level fracture surface and stir zone morphology. The crack initiates from the notch surface due to continuous stress on the aluminium matrix and second phase particle. It is evident from the SEM observations that the crack growth initiated from fatigue pre-crack surface, and further crack propagates along the rolling direction of AA7075-T651 high strength heat treatable aluminium alloy. In Fig. 6(a,b), the arrow indicates the fractured surface morphologies of the parent metal and stir zone CT specimens. Fig. 6(c,d) shows that the interface region of the notch and fatigue pre-cracked area prove the intergranular crack morphology of fractured samples. The other side of the crack initiation promotes precipitates oriented in the matrix alloy, as shown in Fig. 6(c,d). However, the coarse and finer dimples were significantly appeared in both parent metal and stir zone, respectively. Fig 6(e,f) shows the stable crack growth rate in parent and stir zone surface morphology. It reveals that elongated dimples were present in the parent metal specimen, responsible for the ductile failure. The Stir zone had fine microvoids morphology. The precipitates of alloying elements resulted in ductile and cleavage patterns in fracture morphology. Finer and dense dimples around the fracture surface indicated the response of stress states around the residues [11].
Similarly, tunnel created shapes are responsible for the tensile load. The shape and size of the voids and dimples are directly proportional to grain size and precipitates in alloying elements [12-15]. Figure (g, h) confirms the formation of beach mark morphology due to the applied tensile load. The fracture surface of the specimen reveals a complete mechanical failure in parent metal and stir zone specimens.
CONCLUSIONS
This investigation investigated the microstructure, tensile properties, microhardness, and fracture toughness of friction stir welded AA7075T-651. According to obtained results, the following conclusions were made.
(i) The microstructure in the stir zone presence the fine equiaxed and grain structure compared to the parent metal. In the HAZ and TMAZ, the grain structure transformation is due to low heat input.
(ii) The TMAZ of the advancing side had minimum hardness for the FSW joint.
(iii)The fracture toughness of the FSW joint is 23MPa.m1/2, achieving 76% of the parental metal strength. CT specimens’ fracture morphology reveals that the parent metal and stir zone indicate ductile and brittle failure in all regions.
ACKNOWLEDGEMENT
The authors are grateful to the Department of Science and Technology (DST), SERB Division, Government of India, New Delhi, under the Fast Track Young Scientist Scheme to provide financial support through an R&D project. Our sincere thanks to the Department of Manufacturing Engineering, Annamalai University, Chidambaram, India, for extending the facilities of the Centre For Materials Joining and Research (CEMAJOR) Laboratory to carry out this investigation.


